Step ladder restoration and upcycling: step-by-step tutorial (🇵🇹 & 🇬🇧)
🇵🇹 Por vezes, os objetos mais úteis lá de casa são também os mais esquecidos. Foi o que aconteceu com um velho escadote de metal: anos de trabalho, salpicos de tinta e ferrugem tinham-no transformado numa peça que ninguém quereria deixar à vista e que esteve quase a ir para o lixo várias vezes.
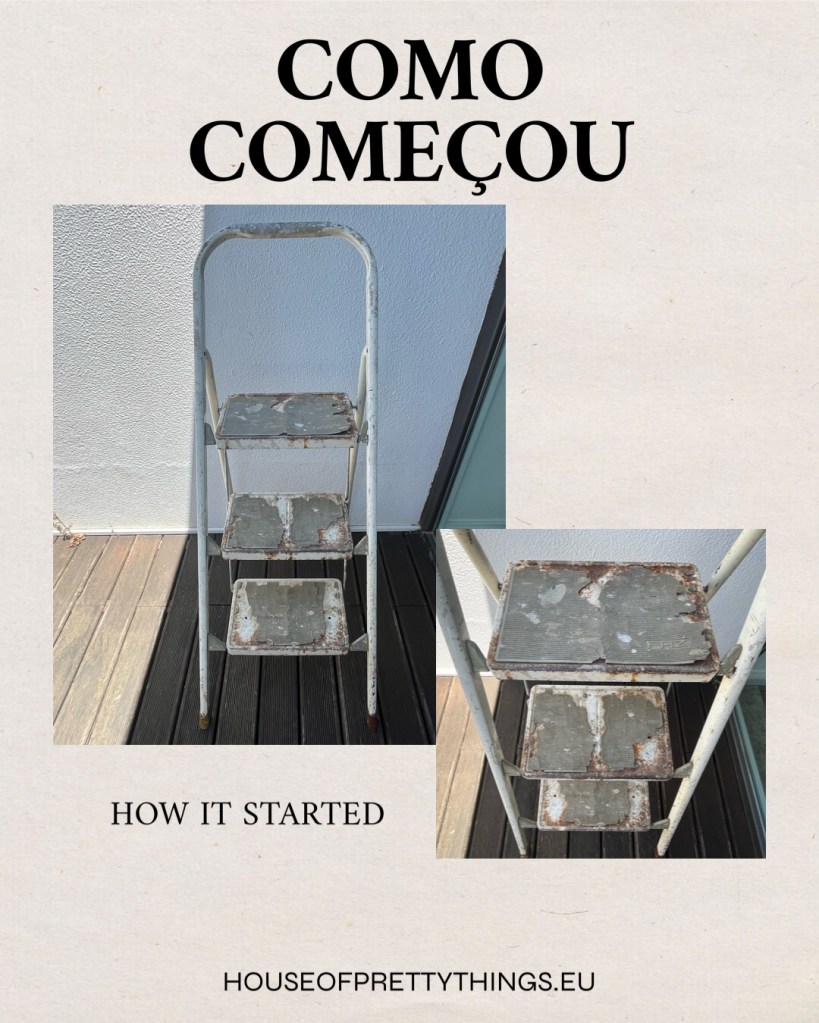
Mas, por baixo de toda aquela aparência de desgaste, estava uma estrutura sólida e perfeitamente funcional, que só precisava de uma boa dose de carinho e paciência.
Decidimos dar-lhe uma nova vida. O objetivo? Transformá-lo num escadote elegante, resistente à ferrugem e, já agora, bonito o suficiente para não ter de estar escondido na arrecadação.
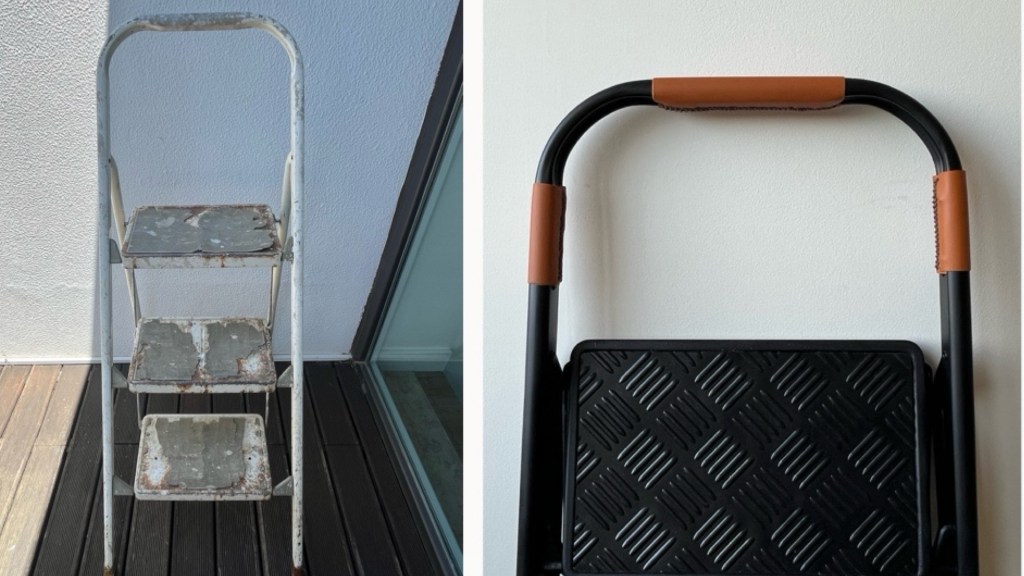
O resultado superou as nossas expectativas: o preto mate deu-lhe um ar sofisticado, os degraus antiderrapantes e as pegas de couro castanho que cosemos à mão no topo deram-lhe o toque final, que o transformou completamente de mero utilitário a objetivo decorativo.
Aqui fica o tutorial completo!
Material necessário:
- Decapante para tinta
- Espátula / raspador de metal
- Escova de aço (e/ou lixa adequada para metal)
- Tinta preta, em spray, anti-ferrugem (para metal)
- Verniz protetor com acabamento mate
- Material antiderrapante para os degraus (vendido a metro)
- Couro castanho (ou material a imitar couro)
- Agulha e linha resistente
- Furador de couro
- Luvas, máscara e óculos de proteção
- Pano e desengordurante para limpeza final
Tutorial passo a passo:
Passo 1 — Avaliar o estado do escadote
Antes de começar, inspecionámos bem a estrutura. A tinta original estava a descascar, havia pontos de ferrugem espalhados e os degraus tinham perdido qualquer aderência, além de terem o seu revestimento antiderrapante completamenre destruido. A boa notícia é que a estrutura metálica continuava sólida e estável. Valia a pena (tentar) recuperá-lo.
Passo 2 — Aplicar o decapante e raspar a tinta original
Começámos por aplicar um decapante para remover a tinta antiga. Deixámos atuar o tempo recomendado e, de seguida, raspámos tudo com uma espátula e uma escova de aço. Este passo é trabalhoso e moroso, mas é fundamental para que a nova tinta adira correctamente.
Dica importante: trabalhar sempre num espaço bem ventilado, com luvas, máscara e óculos de proteção.
Passo 3 — Retirar a base protetora dos degraus
Para podermos tratar o metal em condições e, mais tarde, aplicar o novo material antiderrapante, retirámos todos os restos do material pré-existente.
Passo 4 — Limpar e preparar a superfície
Depois de raspar toda a tinta e os restos da proteção dos degraus, limpámos bem o metal para remover poeiras, resíduos e gordura. Uma superfície limpa e seca é meio caminho andado para um acabamento duradouro.
Passo 5 — Aplicar a tinta anti-ferrugem
Com tudo limpo e seco, aplicámos a tinta preta anti-ferrugem. Optámos por uma tinta específica para metal com propriedades anticorrosivas, que protege a estrutura e dá um acabamento elegante e moderno. Aplicámos duas demãos, deixando secar bem entre cada uma para garantir uma cobertura uniforme.
Passo 6 — Aplicar o verniz protecor mate
Para proteger ainda mais a pintura e dar-lhe um acabamento bonito, aplicámos uma camada de verniz protetor (também em spray) com acabamento mate. A tinta que usámos só existia com acabamento brilhante, e nós temos preferência pelo mate, mas acabou por ser vantajoso: slém de selar a tinta, o verniz deu-lhe o aspecto sofisticado e contemporâneo, sem brilhos, que queriamos.
Passo 7 — Colocar o material antiderrapante nos degraus
Com a tinta e o verniz secos, aplicámos a nova base dos degraus e fizémos a aplicação em cada um. Comprámos este material a metro, pelo que tivémos previamene de medir a superficia dos degraus e cortar o material em concordância. Este passo é essencial para a segurança – um escadote bonito é ótimo, mas também tem de ser seguro usá-lo.
Passo 8 — Coser as pegas de couro no topo
Para o toque final (e este acabou por ser o nosso pormenor preferido!), cosemos couro castanho na barra superior do escadote, no topo e nas duas laterais. Além de ficar contrastar na perfeição com o preto mate, torna a pega mais confortável e agradável ao toque. Medimos o couro, fizemos os furos e cosemos à mão com linha resistente. Foi bastante trabalhoso, admitimos, mas valeu a pena!
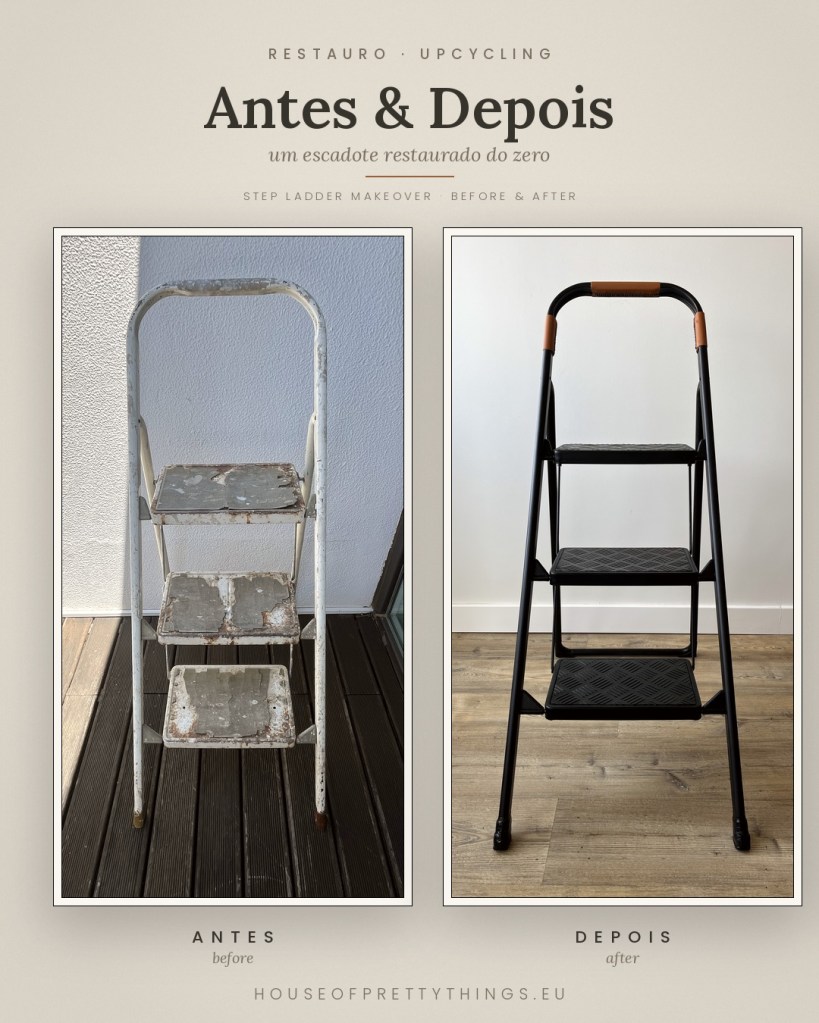
A transformação foi verdadeiramente incrível e ficámos muito contentes com o resultado final.
De um escadote enferrujado, descascado e relegado ao esquecimento, passámos a ter uma peça funcional, resistente e elegante. Tão elegante que deixou de estar fechada na arrecadação e, volta e meia, fica à vista de todos, completamente alinhada com a decoração da nossa casa. O melhor de tudo? Salvámos um objeto totalmente útil e demos-lhe muitos mais anos de vida.
Antes de deitar fora aquele escadote (ou qualquer outro objeto) cheio de ferrugem e tinta velha, lembre-se que, com um pouco de criatividade e paciência, ele pode tornar-se num objeto igualmente útil, mas totalmente diferente.
🇬🇧 Sometimes the most useful things in the house are also the most overlooked. That’s exactly what happened with this old metal step ladder: years of work, paint splatters, and rust had turned it into something nobody would want on display. But underneath all that wear and tear was a solid, perfectly functional structure — it just needed a good dose of care.
We decided to give it a new lease of life. The goal? To transform it into a sleek, rust-resistant step ladder that’s actually good-looking enough not to be hidden away in a cupboard. The result exceeded our expectations: a sophisticated matte black finish, non-slip steps, and hand-stitched brown leather grips at the top.
Here’s the full tutorial!
What You’ll Need
- Paint stripper
- Spatula / metal scraper
- Wire brush (and/or sandpaper suitable for metal)
- Black anti-rust spray paint (for metal)
- Protective varnish with a matte finish
- Non-slip material for the steps
- Brown leather
- Needle and strong thread
- Leather punch
- Gloves, mask, and safety goggles
- Cloth and degreaser for final cleaning
Step by step tutorial
Step 1 — Assess the ladder
Before starting, we gave the structure a thorough inspection. The original paint was peeling, there were patches of rust throughout, and the steps had lost all their grip. The good news: the metal frame was still solid and stable. It was well worth saving.
Step 2 — Apply paint stripper and scrape off the original paint
We started by applying paint stripper to remove the old paint. We let it work for the recommended time, then scraped everything off with a spatula and a wire brush. This step is labour-intensive, but it’s essential for the new paint to adhere properly.
Important: always work in a well-ventilated space, wearing gloves, a mask, and safety goggles.
Step 3 — Remove the step bases
So we could treat the metal properly and later apply the non-slip material, we removed the existing non-slip base of each step.
Step 4 — Clean and prepare the surface
After scraping off all the paint, we cleaned the metal thoroughly to remove dust, residue, and grease. A clean, dry surface goes a long way towards a long-lasting finish.
Step 5 — Apply the anti-rust paint
With everything clean and dry, we applied the black anti-rust paint. We chose a paint specifically formulated for metal with anti-corrosion properties, which protects the structure while giving it that sleek, modern finish. We applied two coats, letting each dry fully to ensure even coverage.
Step 6 — Apply the protective matte varnish
To protect the paintwork even further and give it a beautiful finish, we applied a coat of protective varnish with a matte finish. As well as sealing the paint, the matte varnish gives a sophisticated, contemporary look with no shine.
Step 7 — Add the non-slip material to the steps
Once the paint and varnish were dry, we applied non-slip material to each one. This step is essential for safety – a good-looking ladder is great, but it has to be safe to use.
Step 8 — Stitch the leather grips at the top
For the finishing touch (and our favourite detail!), we stitched brown leather onto the top bar of the ladder. As well as looking lovely and contrasting perfectly with the matte black, it makes the grip more comfortable and pleasant to hold. We measured the leather, made the holes, and stitched it by hand with strong thread.
The transformation was remarkable. From a rusty, peeling step ladder destined to be forgotten, to a functional, sturdy, and elegant piece — the kind you could even leave out in the kitchen or bedroom without it clashing with your décor. The best part? We saved a perfectly useful object from the bin and gave it many more years of life.
Before you throw out that rusty, old-paint-covered step ladder (or any other object), remember this: with a little work and creativity, it could become the prettiest thing in your home. Give it a go!

Leave a comment