Bedside table upcycling (🇵🇹 & 🇬🇧)
🇵🇹 Há projetos que começam com uma descoberta feliz, e este foi um deles. Encontrámos estas duas mesas de cabeceira antigas enquanto explorávamos um sõtão cheio de coisas antigas, de família, – com madeira trabalhada, detalhes entalhados e aquele charme inconfundível dos móveis de outros tempos – e soubemos imediatamente que tinham potencial para muito mais do que acabar no lixo. O único problema? Estavam num estado muito pouco saudável: a madeira escurecida e envelhecida, as ferragens oxidadas, as gavetas e portas empenadas.
Nada que uma boa dose de paciência, lixa e tinta não resolvesse!
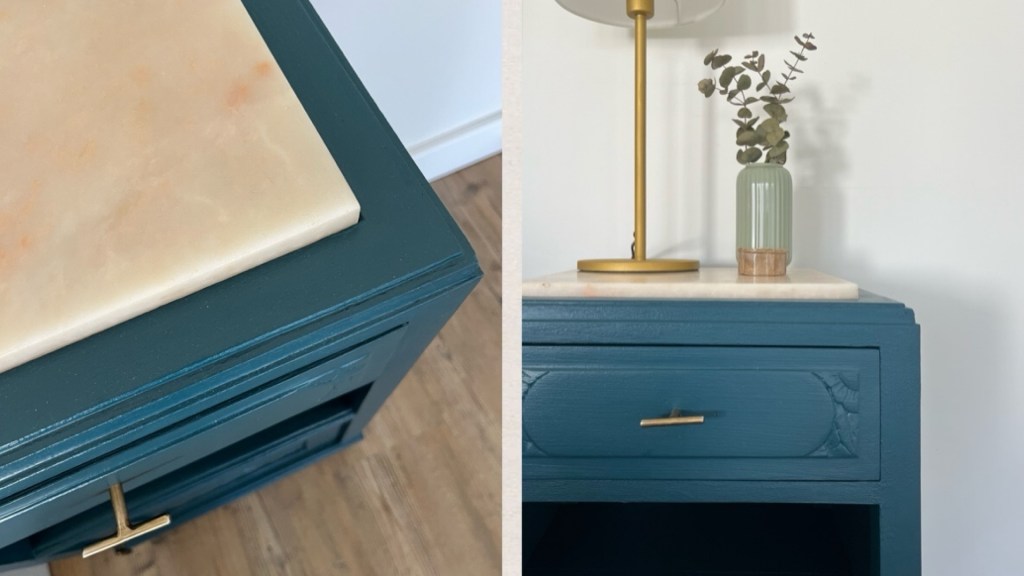
O resultado? Duas mesas de cabeceira completamente transformadas, pintadas num azul-petróleo profundo com novos puxadores em latão dourado e o tampo em mármore original limpo, que lhes deu um acabamento contemporâneo. De vintage abandonado “modern chic” – tudo feito por nós, nos nossos tempos livres.
Aqui fica o tutorial completo!
Material necessário:
- Papel de lixa (grão 80 para desbaste e grão 120–180 para acabamento)
- Massa de madeira para reparação de imperfeições
- Espátula
- Primário para madeira
- Tinta de acabamento (escolhemos um azul petróleo profundo)
- Pincéis e rolo de pintura
- Novas ferragens para a porta (dobradiças e fecho)
- Novos puxadores (optámos por puxadores em T, em latão)
- Chave de fendas / berbequim
- Papel de jornal ou plástico para proteger a área de trabalho
- Luvas e máscara de protecção
Tutorial passo a passo:
Passo 1 — Avaliar o estado dos móveis
Antes de começar, inspecionámos bem as duas mesas. As portas e gavetas estavam empenadas, o que as impedia de abrir e fechar correctamente. As ferragens originais estavam oxidadas e algumas já não funcionavam. A madeira apresentava riscos, manchas e pequenas falhas. Era um bom desafio!
Passo 2 — Desmontar tudo
Retirámos as gavetas, as portas e todas as ferragens existentes — puxadores, dobradiças e fechos. Este passo é essencial para conseguir lixar e pintar cada peça de forma correcta e com melhor acesso a todos os ângulos.
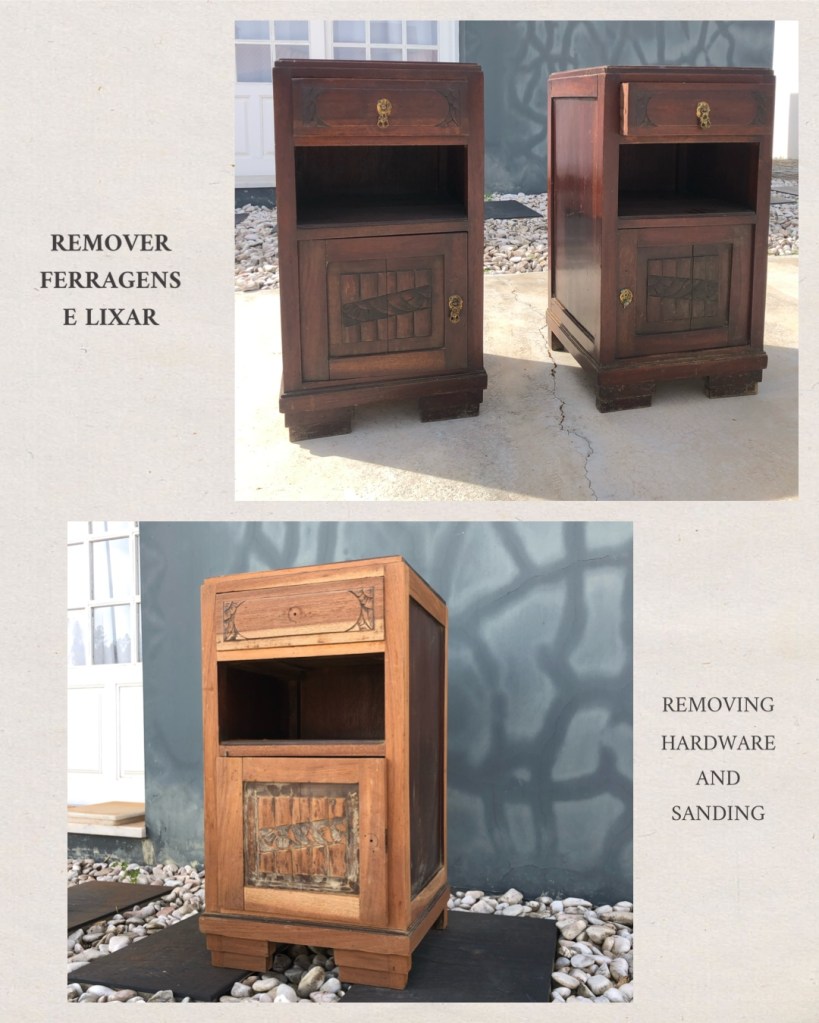
Passo 3 — Lixar
Com papel de lixa de grão 80, lixámos todas as superfícies para remover a camada de verniz antigo e abrir a madeira. Depois, passámos para um grão mais fino (120–180) para alisar bem. Nas arestas das gavetas e portas que estavam empenadas, lixámos com mais cuidado para reduzir o volume e permitir que voltassem a deslizar e fechar correctamente. É um trabalho moroso, mas faz toda a diferença no resultado final.
Passo 4 — Reparar imperfeições
Depois de lixar, foi hora de reparar. Usámos massa de madeira para preencher riscos mais profundos, buracos de ferragens antigas e outras imperfeições na superfície. Aplicámos com espátula, deixámos secar completamente e lixámos novamente até ficar tudo liso e nivelado.
Passo 5 — Encontrar as novas ferragens
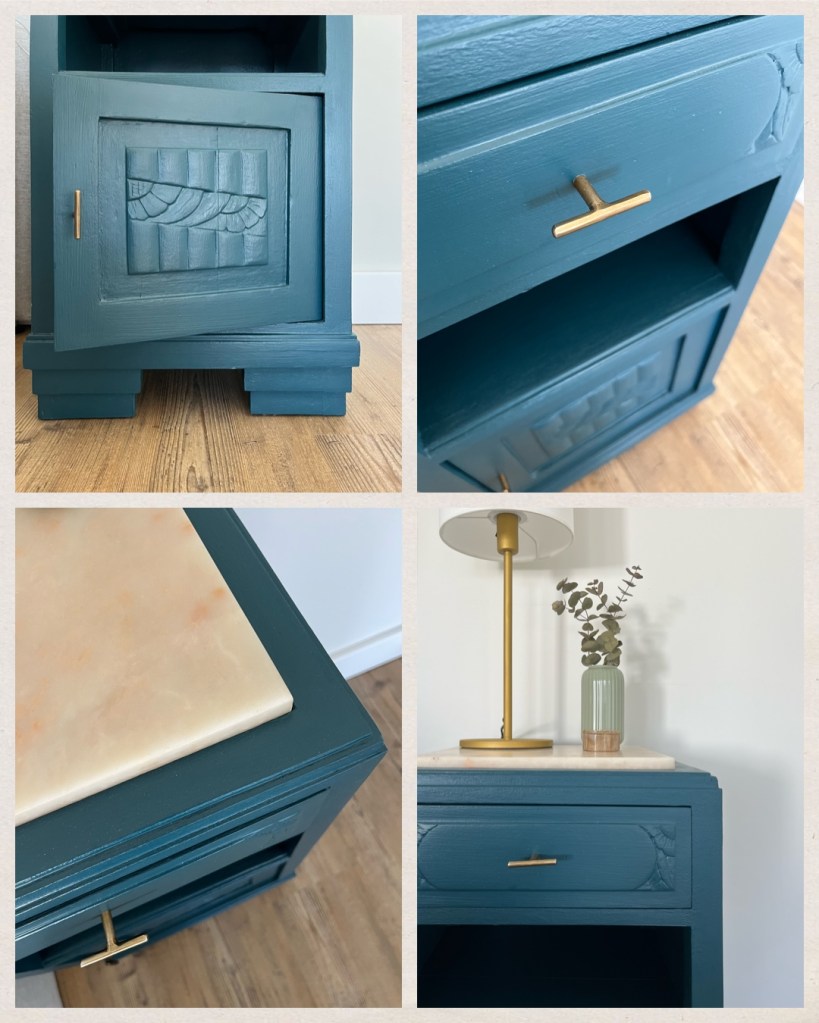
Esta foi, talvez, uma das partes mais divertidas (e também a mais demorada, juntamente com a escolha da cor da tinta!). Queríamos ferragens que fossem simultaneamente funcionais e bonitas. Para a pequena porta da base, encontrámos novas dobradiças e um fecho adequado. Para os puxadores da gaveta e porta, escolhemos puxadores em T em latão dourado — um clássico que combina na perfeição com o azul-petróleo que escolhemos.
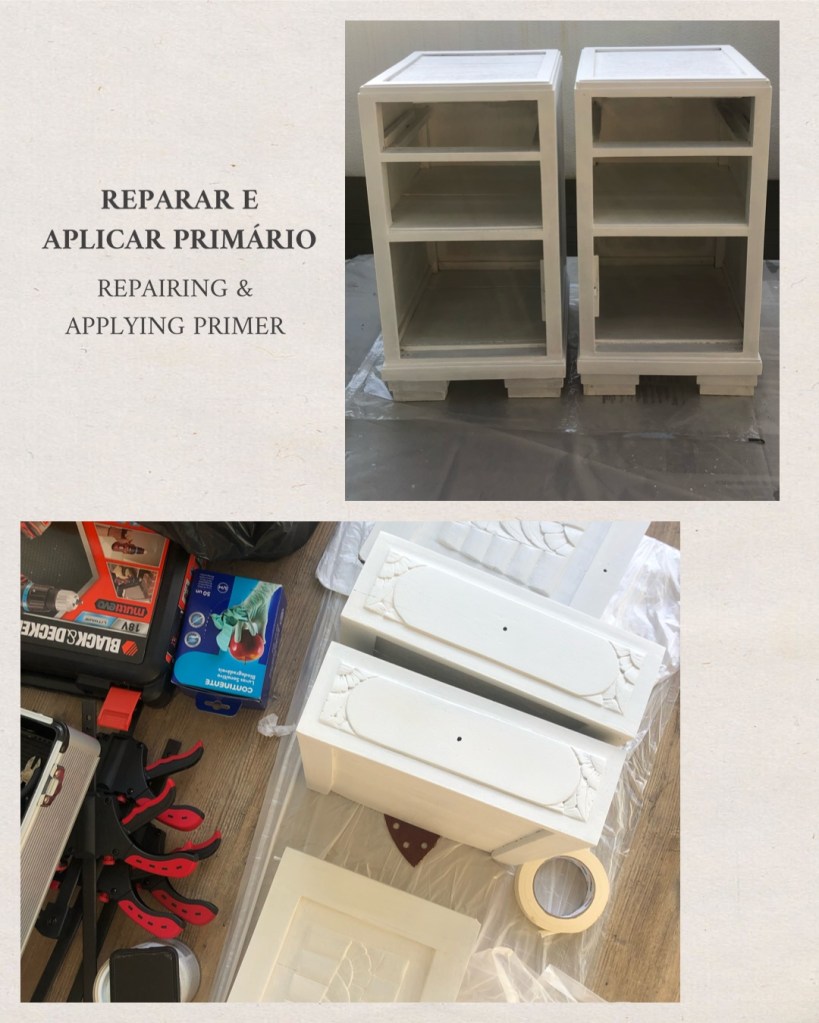
Passo 6 — Aplicar o primário
Com tudo limpo, liso e seco, aplicámos uma demão de primário para madeira em toda a superfície. O primário é essencial para garantir a aderência da tinta final. Deixámos secar o tempo recomendado pelo fabricante.
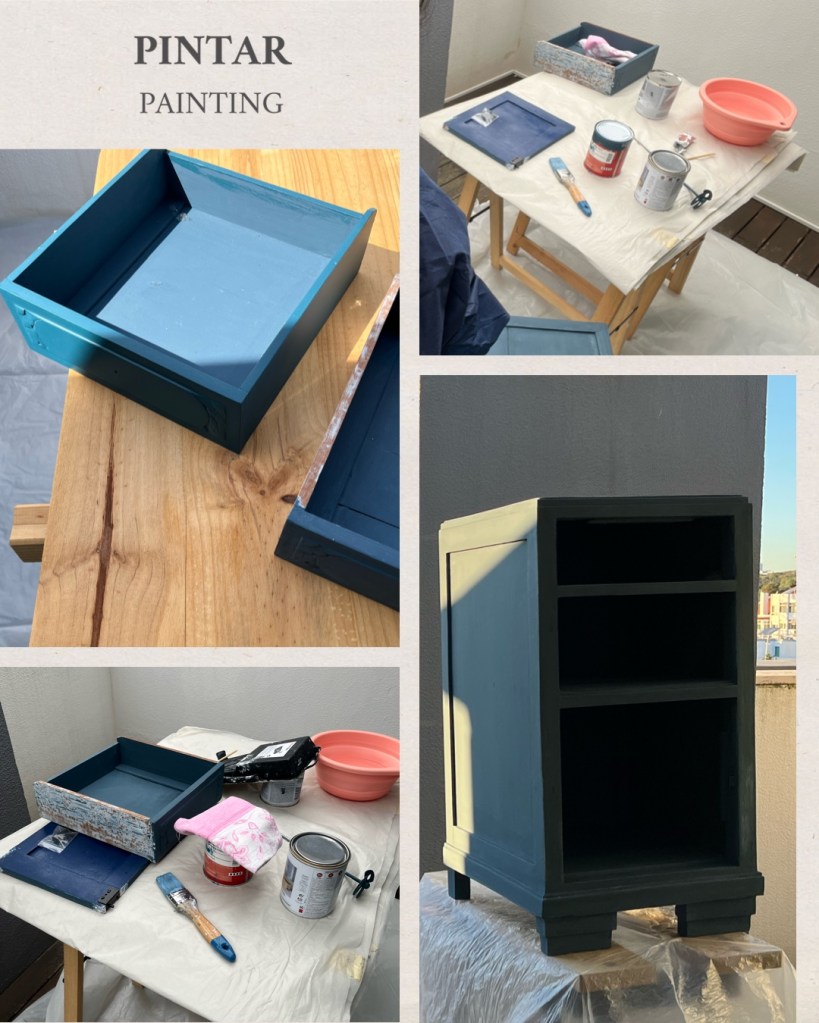
Passo 7 — Pintar
E chegou o momento mais transformador! Escolhemos uma tinta de interior em tom azul-petróleo profundo — uma cor com carácter, elegante e que contrasta lindamente com o latão dos puxadores. A primeira cor que escolhemos não funcionou como gostaríamos, por isso acabámos a escolher uma segunda cor (a que podem ver nas imagens), que resultou na perfeição. Aplicámos duas demão com pincel (para os pormenores e cantos) e rolo (para as superfícies maiores), deixando secar entre cada uma. Pintámos o corpo das mesas e todas as peças separadas — gavetas e portas — para garantir um resultado homogéneo.
Passo 8 — Montar as novas ferragens
Com a tinta completamente seca, procedemos à montagem das novas ferragens. Instalámos as dobradiças e o fecho na porta da base, e aparafusámos os novos puxadores em T na gaveta e na porta. Este momento é sempre muito satisfatório porque é quando os móveis ganham a personalidade final!
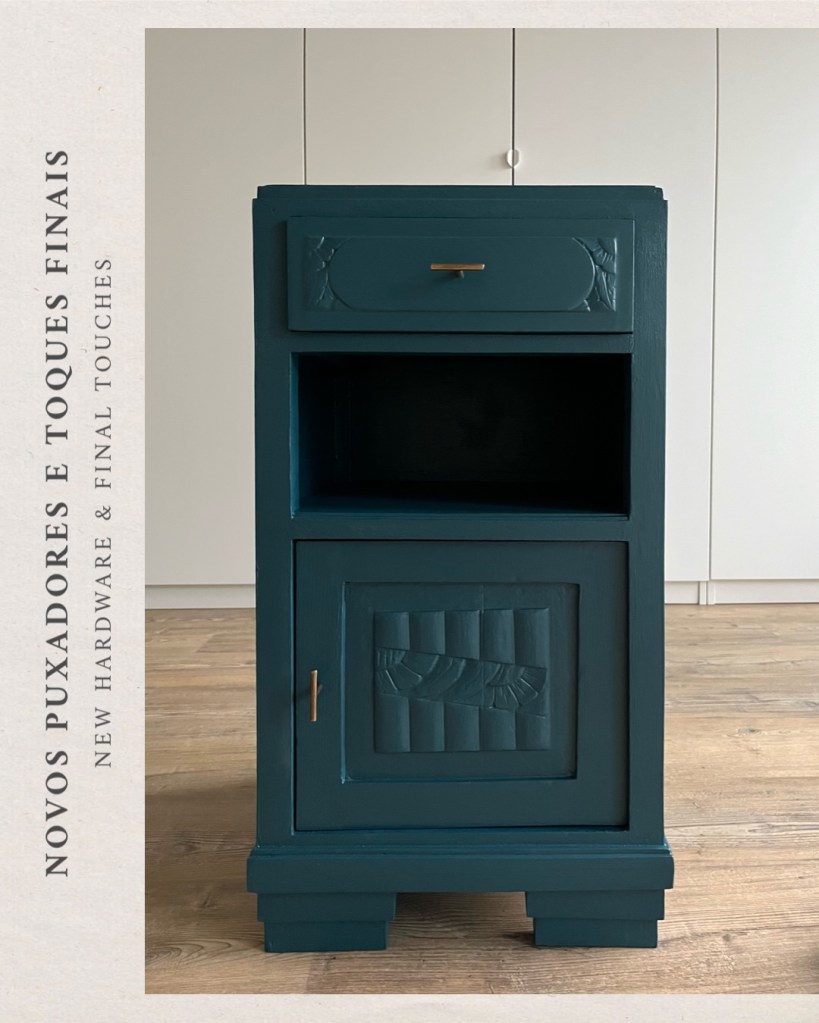
Passo 9 — O toque final: o tampo de mármore
Para elevar ainda mais o resultado, limpámos o tampo de mármore que vinha originalmente com as mesas. Chegámos a considerar não os manter, e usá-los para outro fim, mas fez uma diferença enorme no aspecto final – o contraste entre o mármore claro e o azul-petróleo profundo funciona muito, muito bem.
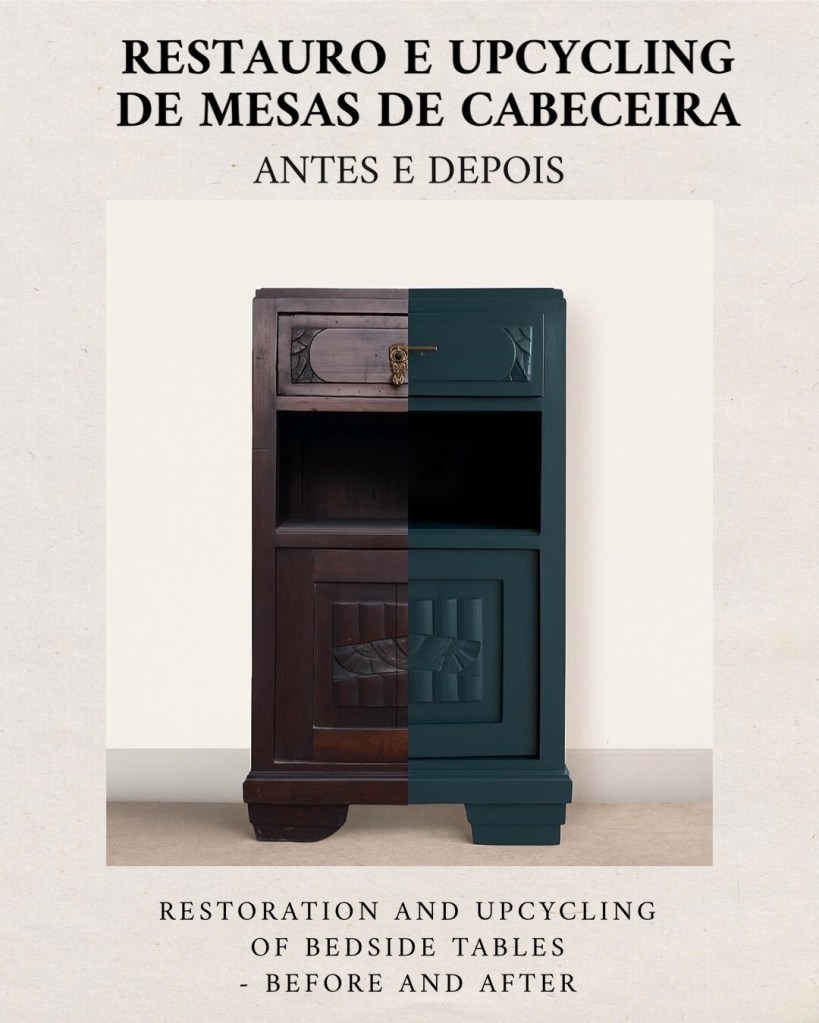
Antes e Depois
A transformação foi total. De dois móveis antigos, escurecidos e com marcas do tempo, passámos a duas mesas de cabeceira com um visual sofisticado e contemporâneo. O melhor? Custaram uma fração do que custariam peças novas equivalentes, e têm aquela história e textura que só os móveis com passado conseguem ter.
Se tem móveis antigos em casa ou encontrar peças com potencial em feiras e lojas em segunda mão, não hesite em dar-lhes uma nova vida. Com um pouco de dedicação, os resultados podem ser incríveis!
🇬🇧 Some projects start with a happy find, and this one was exactly that.
We found these two bedside tables while exploring a loft full of family heirlooms – with carved wood, intricate details, and that unmistakable charm of vintage furniture – and we knew straight away they had so much more potential than being thrown away.
The only problem? They were not in a very good state: darkened wood, rusty hardware, and warped drawers and doors that wouldn’t open or close properly. Nothing that a good dose of patience, sandpaper, and paint couldn’t fix.
The result? Two completely transformed bedside tables, painted in a deep blue colour with new brass hardware and a cleaned marble top that gave them a sleek, contemporary finish. From forgotten vintage to modern chic – all done by us in our spare time.
Here’s the full tutorial!
What You’ll Need
- Sandpaper (80 grit for stripping, 120–180 grit for finishing)
- Wood filler for repairing imperfections
- Spatula / putty knife
- Wood primer
- Top coat paint (we chose a deep blue colour)
- Paintbrushes and roller
- New door hardware (hinges and a latch)
- New handles (we went for T-bar pulls in brass)
- Screwdriver / drill
- Newspaper or plastic sheeting to protect your work area
- Gloves and a dust mask
Step by step tutorial
Step 1 — Assess the furniture
Before starting, we gave both tables a thorough inspection. The drawers and doors were warped, which meant they wouldn’t open or close properly. The original hardware was rusty and some pieces were no longer functional. The wood had scratches, stains, and small imperfections throughout. A good challenge!
Step 2 — Take everything apart
We removed the drawers, doors, and all existing hardware — handles, hinges, and latches. This step is essential to ensure you can sand and paint each piece properly, with full access to every angle.
Step 3 — Sand
Using 80 grit sandpaper, we sanded all surfaces to remove the old varnish and open up the wood grain. We then moved to a finer grit (120–180) to get a smooth finish. On the edges of the warped drawers and doors, we paid extra attention, sanding down to reduce the volume and allow them to slide and close correctly again. It’s time-consuming work, but it makes all the difference to the final result.
Step 4 — Fill and repair imperfections
After sanding, it was time to repair. We used wood filler to fill in deeper scratches, old hardware holes, and any other surface imperfections. Applied with a spatula, left to dry completely, and then sanded back down until everything was smooth and level.
Step 5 — Find the new hardware
This was perhaps the most enjoyable part (and also the most time-consuming!). We wanted hardware that was both functional and beautiful. For the small door at the base, we sourced new hinges and an appropriate latch. For the drawer and door handles, we chose T-bar pulls in brass — a classic that pairs perfectly with the deep blue colour we had planned.
Step 6 — Apply primer
With everything clean, smooth, and dry, we applied a coat of wood primer to all surfaces. Primer is essential for ensuring the top coat adheres properly and for preventing wood knots from bleeding through the final colour. We left it to dry for the manufacturer’s recommended time.
Step 7 — Paint
And here comes the most transformative moment! We chose an interior paint in a deep teal / petrol blue — a colour with real character, elegant and striking, that contrasts beautifully with the brass hardware. We applied two coats using a brush (for details and corners) and a roller (for larger flat surfaces), allowing each coat to dry fully before applying the next. We painted the main bodies of the tables as well as all the separate pieces — drawers and doors — to ensure a consistent finish throughout.
Step 8 — Fit the new hardware
Once the paint was completely dry, we fitted all the new hardware. We installed the hinges and latch on the lower door, and screwed in the new T-bar handles on the drawer and door. This moment is always so satisfying — it’s when the furniture truly comes to life!
Step 9 — The finishing touch: marble tops
To take the result even further, we cleaned the white marble top that came with each table. We considered not keeping the marble tops at all and use it for some different purpose, but it made an enormous difference to the overall look — the contrast between the light marble and the deep teal is simply irresistible.
Before and After
The transformation was total. From two old, darkened pieces with the marks of time, to two bedside tables with a sophisticated, contemporary look. The best part? They cost a fraction of what equivalent new pieces would, and they have that history and texture that only furniture with a past can offer.
If you have old furniture at home or come across pieces with potential at fairs and second-hand shops, don’t hesitate to give them a new life. With a little dedication, the results might just surprise you!


Leave a comment