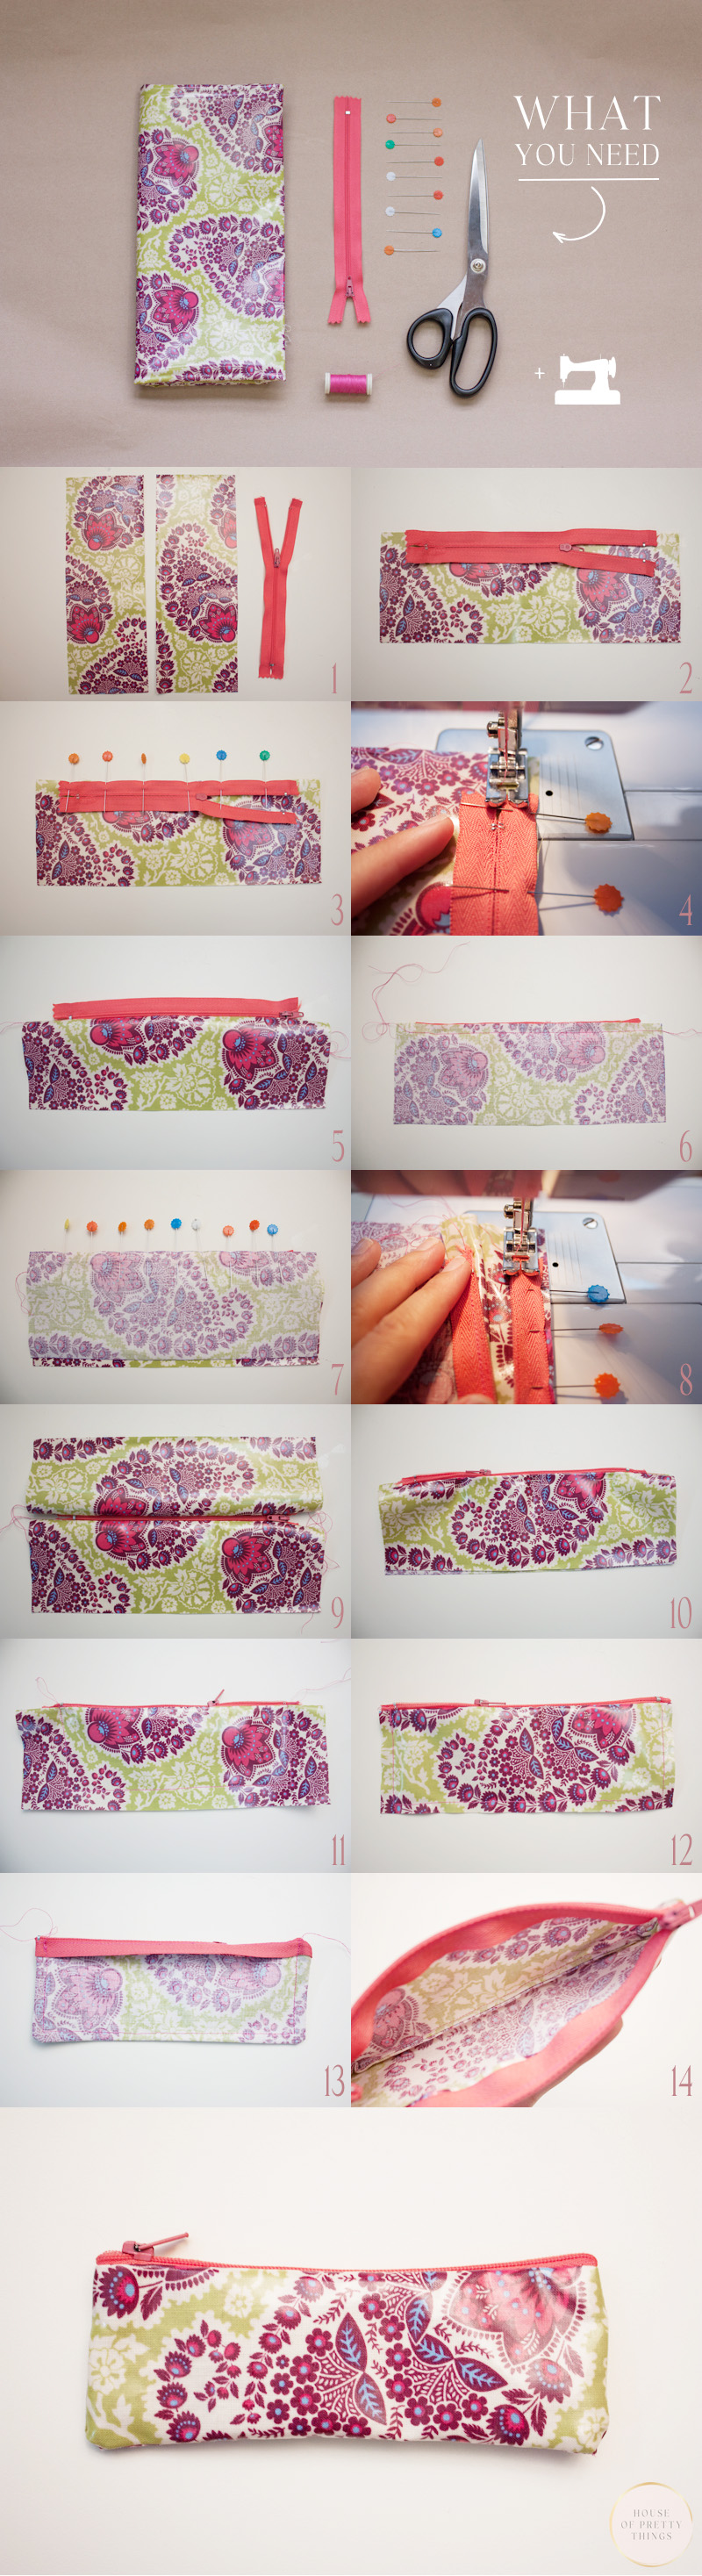
🇵🇹 Este tutorial vai guiar-te, passo a passo, no processo de construção do teu próprio estojo com fecho de correr.
Independentemente do nível de domínio da arte da costura, é o projeto ideal para dares um toque pessoal à tua coleção de material de escritório. Usei uma máquina de costura, mas também funciona se for feito à mão. O acabamento não fica tão “direitinho”, mas não é perfeição que procuramos por aqui. Vamos a isso!
🇬🇧 This easy-to-follow DIY tutorial will guide you through the process of sewing your very own zippered pencil pouch. Whether you’re a beginner or an experienced sewer, this project is perfect for adding a personal touch to your stationery collection. Let’s get started!

O que precisas / What you need
- Tecido (escolhe um padrão ou cor de que gostes) / Fabric (your choice of pattern and colour)
- Fecjo / Zipper
- Tesoura / Scissors
- Linha e agulha (ou máquina de costura) / Needle and thread (or a sewing machine)
- Alfinetes / Pins
Instruções passo-a-passo
🇵🇹
Passo 1. Corta o tecido
Corta duas peças retangulares de tecido com o mesmo tamanho, que formarão a frente e o verso do estojo. Prepara um fecho de correr que tenha o mesmo comprimento que as peças de tecido.
Passo 2. Posiciona o fecho de correr
Coloca uma das peças de tecido com o lado direito virado para cima. Depois, coloca o fecho com o lado direito virado para baixo ao longo da borda superior do tecido.
Passo 3. Prende o fecho com alfinetes
Com a ajuda de alfinetes, fixa o fecho ao tecido, garantindo que está bem alinhado com a borda.
Passo 4. Cose o fecho
Com uma máquina de costura ou agulha e linha, cose ao longo da borda do fecho para o prender firmemente ao tecido.
Passos 5/6. Esse lado está feito!
É assim que deve ficar depois de terminares de coser esse lado — frente e verso.
Passos 7/8. Prende e cose o fecho na outra peça de tecido
Repete os passos 3 e 4 com a segunda peça de tecido.
Passos 9/10. O outro lado também está feito!
É assim que o estojo deve parecer com o tecido esticado (9) e depois dobrado na sua forma final (10).
Passo 11. Cose os lados e a parte de baixo
Cose os três lados abertos do tecido, deixando o lado com o fecho de correr aberto. Isto vai formar a estrutura principal do estojo.
Passo 12. Corta o excesso de tecido
Recorta o tecido em excesso ao longo das costuras para reduzir o volume, deixando uma margem de, pelo menos, 0,5 cm.
Passo 13. Vira o estojo do avesso e reforça as costuras
Vira cuidadosamente o estojo do avesso, passando pelo fecho aberto, e empurra os cantos para fora para um acabamento limpo. Faz uma segunda costura ao longo das bordas (agora pelo interior) para maior resistência, especialmente nos cantos.
Passo 14. Toques finais
Confirma se o interior está limpo de fios e se as costuras estão bem seguras. Alisa o tecido e testa se o fecho funciona corretamente.
E já está!
Criar o teu próprio estojo é um projeto divertido e gratificante. Além de poderes personalizá-lo com diferentes tecidos e cores, é também uma alternativa ecológica aos estojos comprados em loja. Diz-me nos comentários se decidires experimentar.
Step-by-step instructions
🇬🇧
Step 1. Cut the fabric
Cut two rectangular fabric pieces of equal size to form the front and back of the pencil case and prepare a zipper that fits the length of your fabric pieces.
Step 2. Position the zipper
Lay one piece of fabric right side up. Place the zipper face down along the top edge of the fabric.
Step 3. Pin the zipper in place
Secure the zipper using pins, ensuring it is properly aligned along the fabric edge.
Step 4. Sew the zipper
Using a sewing machine or needle and thread, stitch along the edge of the zipper to attach it securely to the fabric.
Steps 5/6. That side is done!
This is how it looks once you finish swing on that side, front and back.
Steps 7/8. Pin and sew the ziper on the other piece of fabric
Repeat what you did in steps 3 and 4.
Steps 9/10. The other side is also done!
This is how the case will look with the fabric flat (9) and folded in its final position (10).
Step 11. Sew the sides and the bottom
Stitch along the three open sides of the fabric, leaving the zippered side open. This will form the main structure of the pencil case.
Step 12. Trim the excess fabric
Cut off any excess fabric along the seams to reduce bulk, leaving a margin of, at least, 0,5 cm.
Step 13. Turn the pencil case right side out and reinforce the seams
Carefully turn the fabric inside out through the open zipper, pushing out the corners for a neat finish. Double-stitch the edges (now from the inside) for added durability, especially at the corners.
Step 14. Final touches
Make sure the interior looks clean and the seams are secure. Smooth out the fabric and ensure the zipper works properly.
Enjoy your handmade fabric pencil case, perfect for organising your stationery in style!
Creating your own fabric pencil case is a fun and rewarding sewing project. Not only does it allows for personalisation with different fabrics and colours, but it’s also an eco-friendly alternative to store-bought cases. Let me know in the comment section if you decided to give it a try.


Leave a comment